
I've always been the type who love to do some weekend baking and it should be gone by the week so I can think of something else to make again.
So this recipe, I've had for years and don't really remember where I've gotten it but it's written safely in my new recipe book that so all my recipes are "finally" in one place now instead of scatter brains and papers flying everywhere. I have this written much simpler in my recipe book but I'll break a few things down for you just in case you're questioning.
These are great for holidays gifting, serving after a dinner party or just a snack for yourself during the day.

1) First step I always do, gather up all the ingredients!
- 150g Sugar
- 125ml Oil (vegetable/ olive oil)
- 2 Eggs (medium)
- ¾ tsp Almond Extract
- 120g Whole Raw Nuts (Chopped lightly)
- 65g Dried Fruit/ Chocolate
- 270g Plain Flour
- 2tsp Baking Powder
- ½ tsp Salt
- ½ tsp Nutmeg
(Extra- 1 Egg whisked with 2 tsp water for brushing)
Then Pre-heat the oven : 165℃
Line a baking tray with a parchment paper or using a silicone one, your choice.
* NOTE- I change the types of nuts, dry fruits and chocolate depending on my mood and taste that day or whatever I have in the pantry too. Feel free to change things up. I just have this as a guide to my liking.
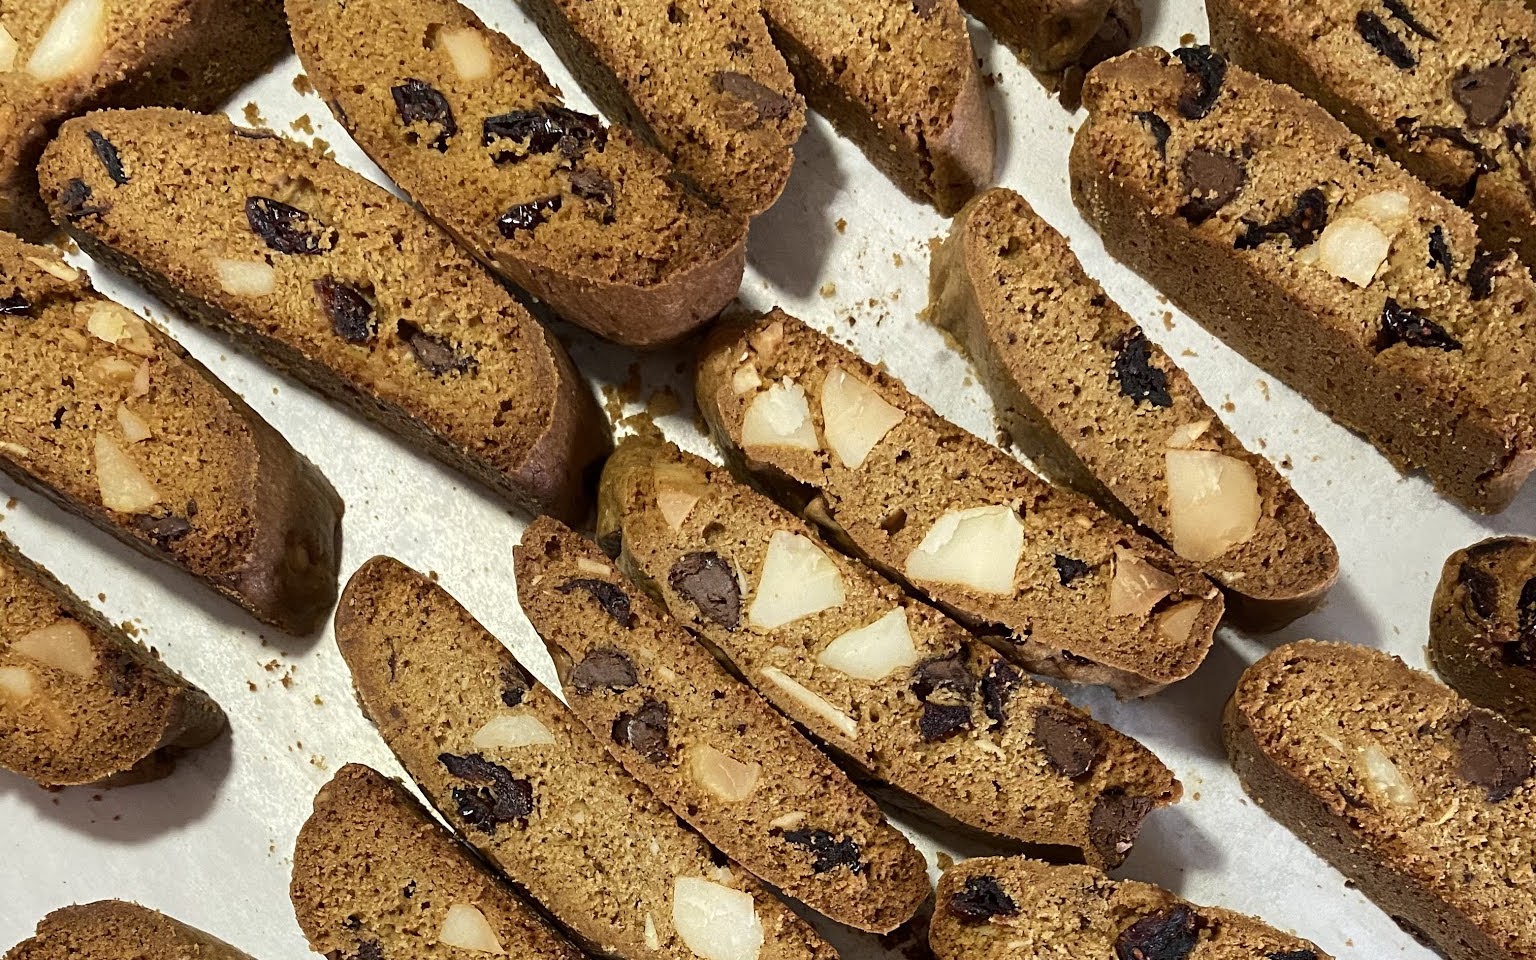
The photos I have here - Macadamia Nut with Semi Sweet Chocolate Chips. It also looks alot darker than most Biscottis because I used Dark Brown Sugar.
The photos I have here - Macadamia Nut with Semi Sweet Chocolate Chips. It also looks alot darker than most Biscottis because I used Dark Brown Sugar.
If you follow me on instagram, you'll have probably already have seen this as well as: Walnut Cranberries.
2) In a large bowl, whisk sugar, oil, eggs & almond extract first.
Then stir in the nuts/ dried fruit or chocolate.
3) Sift in flour, baking powder, salt & nutmeg
Add this to the wet mixture in the large bowl and combine well.
Dough should come together nicely and smooth itself if left rested.
* Depending on the flour type, it can absorb more liquid, so add a little amount of oil if the dough looks dry and cracking. Vise versa, if the dough looks too liquidy and doesn't hold it's shape, sift in a little flour at a time.
4) Shape the dough on the counter into logs, about 12 inches long.
Dust your hands with flour if needed to prevent dough from sticking
Place it on the baking tray with some space apart, the dough will spread
Place it on the baking tray with some space apart, the dough will spread
Pat down the dough lightly to flatten slightly if needed.
Personally I prefer to make 3 logs instead of 2 for size purposes when I'm cutting them.
(Extra- Brush the logs with egg mixture for a more golden brown crust)
BAKE for about 30- 35 mins or until golden brown.
Bring it out the over after and let cool until it's warm to touch
Bring it out the over after and let cool until it's warm to touch
Sometimes cracks will form on the top crust but deep ones will indicate it's over baked.
5) Use a serrated knife or bread knife, slice the logs into ½ inch thick at an angle
Place them back onto the baking tray seeing the glorious nuts and fruit. Return them to the oven to bake about 20 mins or until lightly browned
Place them back onto the baking tray seeing the glorious nuts and fruit. Return them to the oven to bake about 20 mins or until lightly browned
Let it cool completely before enjoying with a nice coffee.
Kept in an air-tight container can last up to a few weeks.
Ones in this household disappears within a week.


No comments